
Toshiba Portege 3010 & 3020
Installing and Reinstalling
The notebooks shipped with Windows 95 or Windows 98, but they can also run 98 SE, ME, 2000 and XP.
Toshiba only officially supported their utilities up to Windows 2000. This table shows the official support for Windows 2000 on various early Portege models:
| Portege Model | Win 2000 Full Support |
Win 2000 Upgrade Support |
Win 2000 Utilities Only |
| 3010/3015 | Yes | ||
| 3020/3025 | Yes | ||
| 3110 | Yes | ||
| 3410 | Yes | ||
| 3440 | Yes | ||
| 7000 | Yes | ||
| 7010/7015 | Yes | ||
| 7020/7025 | Yes | ||
| 7140 | Yes | Yes | |
| 7200 | Yes | Yes |
Installing With a Floppy Drive
This method will only work with a Toshiba Floppy Drive (model PA2669U) that connects to the proprietary connector on the left side of your notebook. This method will not work with USB/serial floppy drives - the 3010 can only boot from the proprietary connector or the hard disk. It cannot boot from the USB port. If you don't have a floppy drive, you'll have to take the more difficult route outlined further down on this page.
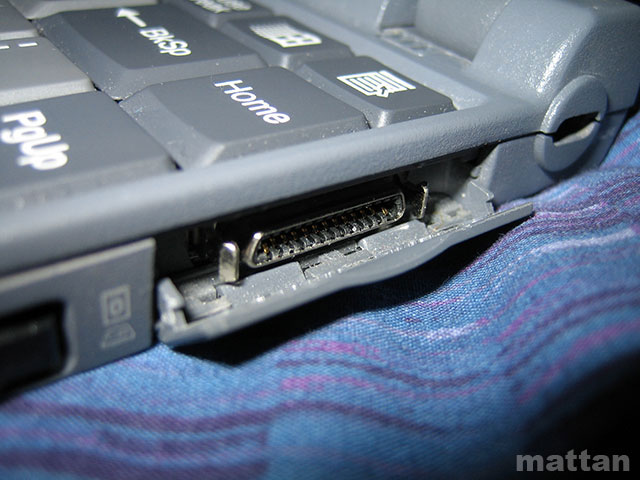
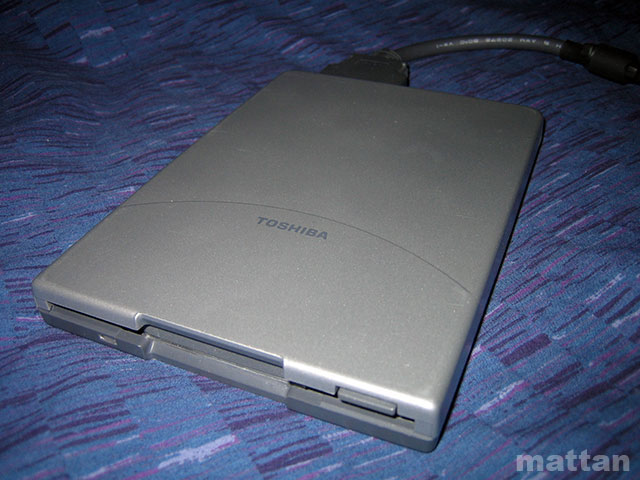
Floppy port, Floppy drive (PA2669U)
The PA2669U floppy drive doesn't need a driver - when connected, the system sees the floppy drive just as a desktop sees a floppy drive. If the drive doesn't work with the Portege, it's likely that there's a problem with the connector cable or the drive itself.
First make sure the BIOS is up-to-date. Version 8.0 is the minimum needed for Windows 2000+. You can check the BIOS version using the Toshiba Hardware Setup program for Windows 98/98 SE (ZIP, 789 KB). The final BIOS for the 3010 (EXE, 276 KB) is version 8.1. The final BIOS for the 3020 (ZIP, 172 KB) is also version 8.1. After creating the BIOS update disk, hold down F12 while rebooting to install the BIOS. Hold down TAB while rebooting to install the KBC.
The easiest method to reinstall the Portege is by using the Toshiba Boot Diskette and the two 'Product Recovery' CDs that came with the computer.
- You can create the Boot Diskette by extracting this archive (ZIP, 534 KB) to a floppy disk. Then copy your CD-ROM drivers to the 'a:\dev\' folder and edit the 'config.sys' to reflect the driver names. Boot from the floppy drive and you'll be walked through the Setup process.
To install from an original Windows installation CD, you can use this lengthier method. It's also more efficient if you'd like to install Windows 98 SE/2000/XP (without upgrading from the default OS) or if you want to initially install the latest Toshiba drivers/software. You should be comfortable with basic MS-DOS commands.
- Create a boot floppy disk that allows your computer to access the CD drive. There are utilities available for TEAC drives (EXE, 654 KB) and for Port/Noteworthy drives (EXE, 643 KB).
- Copy SmartDrive to the boot disk. You can download SmartDrive from this site (ZIP, 14 KB) or you can find it on your Windows installation CD. SmartDrive is a DOS application needed for disk caching during the installation process.
- Now turn off the notebook and ensure the floppy drive, CD drive and AC power are connected. Insert the boot disk into the floppy drive, then power on the computer.
- After the boot disk has finished loading, verify that the CD drive is accessible. Now run SmartDrive - type the following:
a:\smartdrv.exe
If you don't run SmartDrive, setup can take 20-50 times longer to complete. - Now you can format the hard drive. This step will erase the contents of your hard drive. At the command prompt type:
a:
cd dos
format c: /u
- Now, with the Windows full installation disk in the CD drive, copy all of the files from the 'win98' folder to the folder 'win98' (or any other memorable name) on the hard disk. This is so that we can still access the Windows setup files even if the setup program is unable to access the CD drive. First create the appropriate folder on the hard disk using this command:
md c:\win98
Then use this command to copy the files from the CD to the new folder:copy e:\win98\*.* c:\win98
For Windows 2000/XP, follow the same steps but copy the 'i386' folder from the CD to an 'i386' folder on the hard drive. - Ready for installation. To begin Windows 98 Setup, type:
e:\setup.exe
Or, to begin Windows 2000/XP Setup:e:\i386\winnt.exe
- After Setup performs the first reboot, it's possible that it can't access needed files from the CD drive. That's okay for now - just point Setup to the 'c:\win98' (or 'c:\i386') folder that was created earlier on your hard drive. You may have to repeatedly tell it to access that folder as it tries to install various drivers.
- You should now be at the Windows desktop. To get everything working properly, you'll need to install these OS-specific files.
Installing Without a Floppy Drive
It's difficult to reinstall the notebook without a floppy drive because the BIOS can't recognise a CD drive as bootable on startup - it needs to load drivers off a floppy disk first. Fortunately, there are a couple of solutions.
You can buy the external floppy drive second-hand - the model is PA2669U. Then follow the instructions above. Having a floppy drive will also allow you to update to the final BIOS version for the 3010/3020.
Another option is to purchase a 2.5" to 3.5" hard disk adapter to temporarily connect the notebook drive to an IDE-based desktop computer. (Alternatively, you could use a USB IDE HDD docking station to connect it to another computer.)
- Turn off and disconnect the power cord from the desktop computer.
- Connect the pins of the hard disk to the IDE adapter, ensuring it is connected the right way to avoid damage.
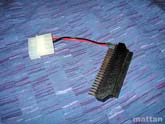
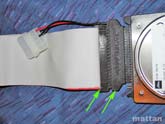
2.5" to 3.5" IDE adapter, Connected adapter
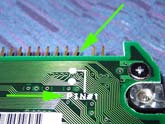
Pin 1 on HD - Connect the other end of the adapter to the slave IDE connector on the desktop. It is the middle connector on the IDE cable. Then connect the power cable from the adapter to the appropriate power cable from the power supply of the desktop computer.
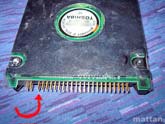
IDE slave connector
- Ensure the HDD, IDE adapter and IDE cable are connected properly. The red line on the IDE cable should be on the same side as Pin 1 on the adapter and Pin 1 on the HDD. There are usually markings or numbers to help correct placement.
- Reconnect the desktop power and boot the desktop computer. Once Windows has loaded, use software such as Seagate DiscWizard to format the notebook disk and make it bootable (to DOS).
Alternatively, if the desktop computer has a floppy drive, you can create a Windows 98 boot disk, boot from it, then format the HDD using:format x: /s /u
- For Windows 98, create the folder 'win98' on the notebook hard drive. Copy the contents of the entire installation CD to that folder.
For Windows 2000/XP, copy the contents of the 'i386' folder from the CD to a folder called 'x:\i386'. - After placing the hard disk back into the notebook, allow
it to boot to the DOS prompt. To begin Windows 98 Setup, execute 'setup' in the folder to which you copied the CD contents:
c:\win98\setup.exe
For Windows 2000/XP Setup:c:\i386\winnt.exe
- Once at the Windows desktop, you'll need to install these OS-specific files.


